AngularJS: Shopping List Application – Part 1
I’ve been getting a lot, and I mean a huge amount, of requests for a tutorial on some form of JavaScript framework. I tried Backbone, but honestly? I just couldn’t get to like it. It is brilliant, but not for me. So someone suggested AngularJS instead & it was love at first sight. Super simple and it even feels like an extension of HTML. Anyway, let’s get to learning.
AngularJS: What Is It?
AngularJS is a ‘superheroic’ (their words not mine) JavaScript MVW (Model, View, Whatever!) famework. It allows you to rapidly develop JavaScript applications without the hassle.
Is It For Me?
I honestly can’t tell you that. Have a look at the demo (coming up), a quick scan of the tutorial & if you like what you see why not follow along?
AngularJS: Working Demo
I know you are probably itching to get hands on with Angular so why not have a play around with the demo below.
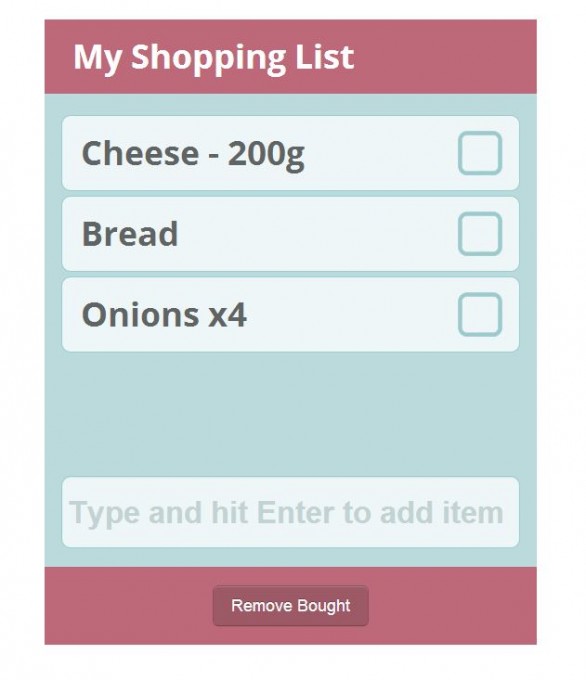
Now this is a pretty looking, but pretty pointless app. I figured it made a nice change to the traditional Todo application examples that litter the web though. Also note that changes do not save. This is because the data is static. This saves my server the huge amount of stress that would be involved from having lots of people hitting it. Also note that I won’t be showing you how to connect to & serve data from a REST service, this would make the tutorial too long. I will however be showing you how to do this in part two of this tutorial which is coming very soon.
AngularJS: Let’s Get Started
First up is setting everything up. To build this app you are going to need to create a suitable directory structure & a few files. Here is what you should have:
- Project Folder
- css
- bootstrap.min.css (download from Twitter Bootstrap)
- main.css
- img
- check.png (download)
- js
- app.js
- index.html
- css
This is the directory structure I have used for the demo. Feel free to follow it as I will probably be referencing this structure from this point on.
AngularJS: HTML Concepts
Before we move onto the HTML I need to explain a few concepts that Angular uses, this will help you to understand the code I’m about to show you.
First Angular uses special attributes inside HTML tags to tell Angular what to do. For example <input type="checkbox" ng-model="switch"> will define a model on a checkbox. The variable set inside the model will update with the value of the checkbox whenever the checkbox is clicked. The value of the checkbox will also update if the value of switch is updated. I will explain others throughout the code.
Secondly Angular uses Mustache syntax for parsing variables in HTML. Mustache syntax is just {{ }} two sets of curly braces. These instruct Angular to output the value of the variable, just like echo would for PHP. The only difference is that it can also output the return value of a function.
Now you have the correct directory structure, the files needed created, and a little understanding of some of Angular’s HTML concepts let’s get on with the HTML.
AngularJS: HTML
The HTML is normally simple, but because of the way Angular works the HTML is going to be an integral part of this tutorial. First let’s make a standard HTML 5 file:
|
1 2 3 4 5 6 7 8 9 10 11 12 13 14 15 16 17 18 19 |
<!DOCTYPE html> <html lang="en" ng-app> <head> <meta charset="utf-8"> <title>AngularJS: Shopping List Application</title> <link href='http://fonts.googleapis.com/css?family=Open+Sans:400,700' rel='stylesheet' type='text/css'> <link rel="stylesheet" href="css/bootstrap.min.css"> <link rel="stylesheet" href="css/main.css"> <script src="//ajax.googleapis.com/ajax/libs/angularjs/1.0.6/angular.min.js"></script> <script src="//cdnjs.cloudflare.com/ajax/libs/underscore.js/1.4.4/underscore-min.js"></script> <script src="js/app.js"></script> </head> <body> </body> </html> |
There we have our basic HTML file. Save this into the index.html file you created earlier. Notice that I’m attaching Angular & Underscore from CDNs. This is fine for my demo, but you may want to consider hosting them yourself for your app.
Now we have our basic file let’s dig into some of the code we need to make our app. This code is mainly HTML, but there are some extra ‘attributes’ that we are going to use to ‘link’ our HTML to Angular. This is not technically correct, but describes it well enough for the moment.
First let’s make the container:
|
1 2 |
<div class="container" ng-controller="ShopCtrl"> </div> |
You may notice ng-controller="ShopCtrl". This instructs Angular that the HTML that follows will be in the context of that Controller (which we haven’t yet created). Now let’s flesh it out some more.
|
1 2 3 4 5 6 7 8 9 10 11 |
<div class="container" ng-controller="ShopCtrl"> <h1>My Shopping List</h1> <div class="main"> <ul class="unstyled"> <li ng-repeat="item in items"> <input type="checkbox" id="item-{{item.id}}" ng-model="item.bought"> <label for="item-{{item.id}}" class="{{isBought(item.bought)}}">{{item.text}}<span></span></label> </li> </ul> </div> </div> |
So now we have a simple h1 to hold our heading. Then we have a main division element to hold our main app. Inside we have a ul with a class to remove the default styling (should be familiar to those that use Twitter Bootstrap). Next we have a li You may notice a strange attribute in there. The ng-repeat tells Angular that we want to loop through an array of items and repeat the current element & it’s contents for each one that it finds. This should be very familiar to anyone used to the foreach function/method in modern browsers or PHP.
Inside that li we have some more code. First an input this simply adds a checkbox so we can tick an item once we’ve bought it. It has two ‘odd’ attributes. First an id, this id is generated by Angular using item-{{item.id}} this will look like item-1 where ‘1’ is the id of the item. This is used so we can match the input & label together for styling purposes. The last attribute in the input is the ng-model this attribute tells Angular to link the value of item.bought with the input. So when we update the checkbox’s value (say by clicking) it will update the attached item.bought value. The same applies the opposite way around. If the value of item.bought is updated by say manually updating the value then the checkbox will change to match (true = checked, false = un-checked).
Now let’s add the bit of the HTML that will be used to add new items to the shopping list.
|
1 2 3 4 5 6 7 8 9 10 11 12 13 14 15 16 17 18 |
<div class="container" ng-controller="ShopCtrl"> <h1>My Shopping List</h1> <div class="main"> <ul class="unstyled"> <li ng-repeat="item in items"> <input type="checkbox" id="item-{{item.id}}" ng-model="item.bought"> <label for="item-{{item.id}}" class="{{isBought(item.bought)}}">{{item.text}}<span></span></label> </li> </ul> <form class="form-horizontal" ng-submit="addItem()"> <input type="text" ng-model="itemEntry" placeholder="Type and hit Enter to add item"> </form> </div> <div class="footer"> <button class="btn btn-large btn-danger" ng-click="clearBought()">Remove Bought</button> </div> </div> |
You can now see we have a form. It is just a bog standard form with a class for styling and another Angular attribute. ng-submit does exactly what you think it does. Execute the function shown when the form is submitted. It has the added bonus of cancelling the default action, unless there is an action attribute defined on the form. In this case our function instructs Angular to add the text held in the input to the list.
Next is our input. First up is ng-model this again tells Angular that we want the value of this element to update the variable inside the attribute, in this case itemEntry, or vice-versa. Finally we have a placeholder attribute for all our modern browsers.
You may also notice I’ve included the footer. This is the last piece of HTML. It is just a button styled by bootstrap and has a ng-click attribute. This just tells it to fire clearBought() when the button is clicked.
Well, that’s all the HTML. Let’s move straight onto the JS.
AngularJS: JavaScript
The JavaScript is much smaller than you’d think, thanks to Angular. First let’s define our controller, remember? We set this in our HTML earlier.
|
1 2 3 |
function ShopCtrl($scope) { } |
That’s all there is to it. You may be wondering what $scope is. The easiest way to think of it is as a variable that everything inside the element you called ng-controller on has access to. This is not the most detailed explanation, but it should be enough to understand what is going on without being too confusing.
Let’s flesh our Angular out a bit more with some items.
|
1 2 3 4 5 6 7 8 9 |
function ShopCtrl($scope) { $scope.items = [ {id: 1, text: 'Cheese - 200g', bought: false}, {id: 2, text: 'Bread', bought: true}, {id: 3, text: 'Onions x4', bought: false} ]; } |
Now we have some items in a nice array. This data would probably be pulled in from a REST based API but for the moment we are just focusing on getting our app to work, I’ll cover pulling in external data & saving it in the next part.
Basically all we are doing is assigning some items to an items variable which is part of the $scope. That way in our HTML we can just access it as items. Make sense?
|
1 2 3 4 5 6 7 8 9 10 11 12 13 14 |
function ShopCtrl($scope) { $scope.items = [ {id: 1, text: 'Cheese - 200g', bought: false}, {id: 2, text: 'Bread', bought: true}, {id: 3, text: 'Onions x4', bought: false} ]; $scope.clearBought = function() { $scope.items = _.filter($scope.items, function(item) { return !item.bought; }); } } |
This time we’ve added the clearBought method to our $scope you might remember this one is used in the HTML to clear the items that have been marked as bought. All we are doing in this function is to filter (using underscore) our items and return only the ones where item.bought is set to false as these haven’t yet been bought. The others will not be returned & our new list will only consist of those items that haven’t yet been bought.
|
1 2 3 4 5 6 7 8 9 10 11 12 13 14 15 16 17 18 19 |
function ShopCtrl($scope) { $scope.items = [ {id: 1, text: 'Cheese - 200g', bought: false}, {id: 2, text: 'Bread', bought: true}, {id: 3, text: 'Onions x4', bought: false} ]; $scope.clearBought = function() { $scope.items = _.filter($scope.items, function(item) { return !item.bought; }); } $scope.addItem = function() { $scope.items.push({text: $scope.itemEntry, bought: false, id: ($scope.items.length + 1) }); $scope.itemEntry = ''; } } |
Next we’ve added the addItem method. This, as you might have guessed, adds an item to our list. To do this we just push a new item onto our items array. We provide the text from $scope.itemEntry (remember that holds the value of the text field), we automatically assume that it hasn’t been bought yet (why are you adding it to the list if it has?), and the ID is just the total of the items plus one. We then empty the text field so that it is ready to take a new value.
|
1 2 3 4 5 6 7 8 9 10 11 12 13 14 15 16 17 18 19 20 21 22 23 |
function ShopCtrl($scope) { $scope.items = [ {id: 1, text: 'Cheese - 200g', bought: false}, {id: 2, text: 'Bread', bought: true}, {id: 3, text: 'Onions x4', bought: false} ]; $scope.clearBought = function() { $scope.items = _.filter($scope.items, function(item) { return !item.bought; }); } $scope.addItem = function() { $scope.items.push({text: $scope.itemEntry, bought: false, id: ($scope.items.length + 1) }); $scope.itemEntry = ''; } $scope.isBought = function(bought) { return (bought) ? 'bought' : 'not-bought'; } } |
Finally we add the isBought method. This just returns bought or not-bought depending on if the item has been bought for styling purposes. It is placed in the label as a class. One interesting thing about this method is that the bought value is passed through from the HTML since we do not know which item the loop (in the HTML) is referring to. So passing it’s value through as a parameter allows us to get the right one without any issues.
Believe it or not that is it. You may notice one or two extra methods in my demo source. These are just extras from when I was playing around and are not required for the code to work.
AngularJS: CSS
That’s all there is to it. All we need to do now is to style it so it looks nice. To do that here is the CSS I used. Remember though that this is in addition to Twitter Bootstrap so if you don’t have the Bootstrap CSS already head on over to Twitter Bootstrap’s site & get it.
|
1 2 3 4 5 6 7 8 9 10 11 12 13 14 15 16 17 18 19 20 21 22 23 24 25 26 27 28 29 30 31 32 33 34 35 36 37 38 39 40 41 42 43 44 45 46 47 48 49 50 51 52 53 54 55 56 57 58 59 60 61 62 63 64 65 66 67 68 69 70 71 72 73 74 75 76 77 78 79 80 81 82 83 84 85 86 87 88 89 90 91 92 93 94 95 96 97 98 99 100 101 102 103 104 105 106 107 108 109 110 111 112 113 114 115 116 117 118 119 120 121 122 123 124 125 126 127 128 129 130 |
.container * { box-sizing: border-box; -moz-box-sizing: border-box; -o-box-sizing: border-box; -ms-box-sizing: border-box; -webkit-box-sizing: border-box; } .container { width: 530px; margin-top: 50px; margin-bottom: 50px; font-family: 'Open Sans', sans-serif; -webkit-box-shadow: 0px 0px 1px 1px rgba(0, 0, 0, .3); box-shadow: 0px 0px 1px 1px rgba(0, 0, 0, .3); } .container h1 { background: #be697a; width: 100%; padding-left: 30px; margin: 0; font-size: 36px; font-weight: 700; line-height: 80px; color: #fff; } .container .main { position: relative; background: #bbdadc; padding: 18px 18px 110px 18px; min-height: 510px; } .container .main li label { display: block; background: #eef6f7; margin-top: 5px; font-weight: 700; font-size: 36px; line-height: 80px; border: 1px solid #98ced1; -webkit-border-radius: 10px; border-radius: 10px; color: #5f6565; } .container .main form { position: absolute; bottom: 0; width: 494px; } .container .main form input { width: 100%; height: 78px; display: inline-block; background: #eef6f7; margin-top: 5px; font-weight: 700; font-size: 33px; line-height: 78px; border: 1px solid #98ced1; -webkit-border-radius: 10px; border-radius: 10px; color: #5f6565; } .container .main .bought { text-decoration: line-through; color: #acb5b5; } .container .footer { background: #be697a; width: 100%; padding: 20px; text-align: center; } .container .footer button { background: #9d5966; } .container .footer button:hover { background: #e07d91; } input[type=checkbox] { display:none; } label { position: relative; padding-left:20px; display:inline-block; line-height:15px; background-repeat:no-repeat; background-position: 0 0; font-size:15px; vertical-align:middle; cursor:pointer; } label > span { position: absolute; top: 20%; right: 10px; display: block; background: transparent url(../img/check.png) no-repeat 0 0; width: 56px; height: 48px; } label.bought > span { background-position: 0 -48px; } /* Placeholder color change */ input::-webkit-input-placeholder { color: #c3d3d4; } input:-moz-placeholder { /* Firefox 18- */ color: #c3d3d4; } input::-moz-placeholder { /* Firefox 19+ */ color: #c3d3d4; } input:-ms-input-placeholder { color: #c3d3d4; } |
This is the CSS used to create the demo, feel free to use it, create your own or modify it.
Bug Fix Update
There is a small bug in the code that will cause duplicate IDs to be created for items under certain conditions. Yoni, who found the bug, has left an excellent comment on how to fix it.
AngularJS: Summary
That’s it for now. I will be extending this tutorial with a second part very soon. The second part will explain how to pull in data from a REST API that we will create (probably with Laravel) and have it save back to the server too. In the meantime, if you like a challenge, why not try to add in a REST API of your own. If not just look out for the second part coming soon.
As always if you have any questions about the tutorial please ask them in the comments area below. I will try my best to answer them.
AngularJS: Part Two Now Available
Ready to move on to part two? Then go visit the second part of this AngularJS Shopping List tutorial.
10 Comments
Tristan Bacon
I can’t wait for Part 2 now! Any idea when you’ll be posting it?
Paul Robinson
Hi Tristan,
It should be the end of this week, start of next. I’ve just been asked to do two fairly large WordPress builds, so I’m trying to fit both in at the same time. 😉
Holger
Excellent beginners tutorial – Thanks a lot! One question: Why didn’t you use ngApp to bootstrap the app?
Albert Valdez
You miss the NG-APP in
🙂
Yoni
Thanks Paul, it’s a really cool tutorial.
Only, two minor bugs we noticed:
1. (As Albert already mentioned) The html tag is missing the “ng-app” directive. This is actually fixed in your demo.
2. There’s a bug in the id generation in addItem that can cause duplicate ids.
To reproduce:
* Load the page with default dataset
* Press “Remove Bought” so that you’ll now have items with ids 1 and 3.
* Add a new item and (here’s the bug), it’ll also get the id 3.
* Now if you try to check as bought the new item, it’ll mark the earlier item with id 3.
To fix this, we can keep the last id used, similar to what you used in part two of the tutorial with “last.id + 1”. Below is our solution:
Paul Robinson
Hi Yoni,
Thank you for sharing this fix, I’ll add a note with a link to your comment into the post so that anyone following can fix the bug too. I’ve also added ng-app to the HTML tag. Not sure how it was missed out when the code written here is a copy of the demo code… Spooky!
Thank you again for sharing the fix. 🙂
Guguga
Hi,
I tried to make this but it didn’t work for me.
Apparently global controllers don’t not work starting from angular 1.3..
So check this out
http://stackoverflow.com/questions/25727603/why-wont-my-simple-angularjs-work
Kyle
I know this is an older tutorial, but I would love to see part 2 posted. It gives the standard “404 not found” page which doesn’t allow me to finish it. Any chance you could re-post the tutorial 2? Thanks!
Paul Robinson
Hi Kyle,
Sorry for that. I swear I had fixed that link but apparently not. I’ve just fixed it now, give the link at the end of the post another try and it should take you to the correct post this time.