Using Nivo Slider In WordPress With Custom Captions
As I said Andy asked if it was possible to use Nivo’s custom captions inside WordPress, and while I did answer in the comments, I think it’s worthy of it’s own post to explain what is going on inside the code.
If you missed the first post on Nivo slider you’ll need to go back and follow that before you can continue on with this tutorial.
I’m going to explain how to do it in two ways. The first is using the post title, and the second will be with a custom field. All modifications are made to the theme file with the Nivo slider HTML inside, not the functions.php file.
Custom Captions: Post Title
Okay, first let’s refresh our memory with what the code we have right now looks like:
|
1 2 3 4 5 6 7 8 9 10 11 12 13 14 15 |
<div id="slider"> <?php $tmp = $wp_query; $wp_query = new WP_Query('posts_per_page=5&category_name=featured'); if($wp_query->have_posts()) : while($wp_query->have_posts()) : the_post(); ?> <a href="<?php the_permalink(); ?>"><?php the_post_thumbnail('nivothumb'); ?></a> <?php endwhile; endif; $wp_query = $tmp; ?> </div><!-- close #slider --> |
This code generates the images that will be used for the slider, as well as the HTML & captions.
Because we all like pictures to spice up a post, and because I want to show you the only difference between the sliders is the caption’s contents, here is what we are shooting for.

Image from Chuck. © NBC Studios. No infringement intended. Used for illustrative purposes only.
As you can see the slider is showing the title of the post in the caption. So let’s dive into the code that makes this magic happen. The code is nearly the same as before but has some new lines thrown in, because of that I’m going to highlight both the modified & new lines.
|
1 2 3 4 5 6 7 8 9 10 11 12 13 14 15 16 17 18 19 20 21 22 23 24 25 26 27 |
<div id="slider"> <?php $captions = array(); $tmp = $wp_query; $wp_query = new WP_Query('posts_per_page=5&category_name=featured'); if($wp_query->have_posts()) : while($wp_query->have_posts()) : $wp_query->the_post(); $captions[] = get_the_title($post->ID); $image = wp_get_attachment_image_src( get_post_thumbnail_id($post->ID), 'nivothumb'); ?> <a href="<?php the_permalink(); ?>"><img src="<?php echo $image[0]; ?>" class="attachment-nivothumb wp-post-image" title="#caption<?php echo count($captions)-1; ?>" alt="<?php the_title_attribute(); ?>" /></a> <?php endwhile; endif; $wp_query = $tmp; ?> </div><!-- close #slider --> <?php foreach($captions as $key => $caption) : ?> <div id="caption<?php echo $key; ?>" class="nivo-html-caption"> <?php echo $caption; ?> </div> <?php endforeach; ?> |
What we are doing in the code is creating an array to hold the title of each post. Then outputting it after the slider as Nivo requires the captions to be placed in div elements outside the slider element. We use a foreach to run through the titles we saved.
An important thing to notice is the use of $key in the caption code and the use of count() in the main code. Nivo requires the id of the div element with the caption to match the title of it’s corresponding image. This is how it matches the caption with the image. To help deal with that we count how many entries we have in the array holding the titles so far and minus one. We do this because the array key counts from zero & count() counts from one. This makes the ID and title’s match. This same method is used later for the custom fields, the array just holds the custom field text instead of post titles.
The tricky part is the image tag. the_post_thumbnail() automatically outputs an image tag, but we need to add in the title attribute I mentioned for the custom captions to work. To do this we manually grab the image path using the thumbnails ID and the internal WP function to grab the attachments image URL. Using that info we build our own image tag adding in the classes, source and title as needed.
All done. Now let’s try a custom field instead.
Custom Captions: Custom Field
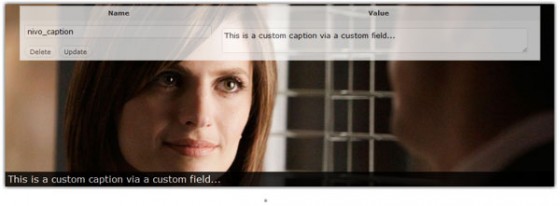
Like I said I’m a sucker for an image so here is what we are going for.

Image from Castle. © ABC Studios. No infringement intended. Used for illustrative purposes only.
As you can see the text entered in the custom field is shown inside the caption box. How is this done? Well the code is nearly exactly the same as the code for using post titles. This time I’ll highlight the lines that are different between the post title code & this code.
|
1 2 3 4 5 6 7 8 9 10 11 12 13 14 15 16 17 18 19 20 21 22 23 24 25 26 27 |
<div id="slider"> <?php $captions = array(); $tmp = $wp_query; $wp_query = new WP_Query('posts_per_page=5&category_name=featured'); if($wp_query->have_posts()) : while($wp_query->have_posts()) : $wp_query->the_post(); $captions[] = get_post_meta($post->ID, 'nivo_caption', TRUE); $image = wp_get_attachment_image_src( get_post_thumbnail_id($post->ID), 'nivothumb'); ?> <a href="<?php the_permalink(); ?>"><img src="<?php echo $image[0]; ?>" class="attachment-nivothumb wp-post-image" title="#caption<?php echo count($captions)-1; ?>" alt="<?php the_title_attribute(); ?>" /></a> <?php endwhile; endif; $wp_query = $tmp; ?> </div><!-- close #slider --> <?php foreach($captions as $key => $caption) : ?> <div id="caption<?php echo $key; ?>" class="nivo-html-caption"> <?php echo $caption; ?> </div> <?php endforeach; ?> |
Yep, that’s the only line you need to change. The line simply tells WordPress to grab the contents of the custom field with the key nivo_caption. So remember that nivo_caption is the key to use. You can, however, change it by altering the aforementioned text on line 9 of that code.
Updated – Custom Captions: Post Title & Post Excerpt
So you want to use both the title of the post & the excerpt inside the Nivo caption? Well normally I’d recommend you use jQuery Cycle to mix text with images in a slider, but it is possible with Nivo Slider too. First, because I’ve got a trend going, here is how it looks.

Image from Chuck Versus The Balcony (S4E11). © NBC Studios. No infringement intended. Used for illustrative purposes only.
You’ll need some CSS to get the caption to look like it does in the image. It’s pretty simple:
|
1 2 3 4 5 6 7 8 9 10 11 12 13 14 15 16 17 18 19 20 21 |
.nivo-caption { background: none repeat scroll 0 0 #000000; bottom: 0; color: #FFFFFF; height: 100%; opacity: 0.8; position: absolute; left: 0; width: 30%; z-index: 89; } .nivo-caption h3 { font-weight: bold; font-size: 16px; margin: 10px 0 5px 0; padding: 0 5px 0 7px; } .nivo-caption p { padding: 0 5px 0 7px; margin: 10px 0 10px 0; } |
The caption style is a copy of the default caption style, but with the width set to 30% & the height to 100%. This changes it to go vertical instead of the normal horizontal. The H3 and P styles are for the text in the caption and can be customized to whatever you wish. One small thing to note is that you can get the caption to be on the right instead of the left by changing left: 0; to right: 0;.
Now for the code to make the caption.
|
1 2 3 4 5 6 7 8 9 10 11 12 13 14 15 16 17 18 19 20 21 22 23 24 25 26 27 |
<div id="slider"> <?php $captions = array(); $tmp = $wp_query; $wp_query = new WP_Query('posts_per_page=5&category_name=featured'); if($wp_query->have_posts()) : while($wp_query->have_posts()) : $wp_query->the_post(); $captions[] = '<h3>'.get_the_title($post->ID).'</h3><p>'.get_the_excerpt().'</p>'; $image = wp_get_attachment_image_src( get_post_thumbnail_id($post->ID), 'nivothumb'); ?> <a href="<?php the_permalink(); ?>"><img src="<?php echo $image[0]; ?>" class="attachment-nivothumb wp-post-image" title="#caption<?php echo count($captions)-1; ?>" alt="<?php the_title_attribute(); ?>" /></a> <?php endwhile; endif; $wp_query = $tmp; ?> </div><!-- close #slider --> <?php foreach($captions as $key => $caption) : ?> <div id="caption<?php echo $key; ?>" class="nivo-html-caption"> <?php echo $caption; ?> </div> <?php endforeach; ?> |
As with the others the only line that is different is the highlighted one. All we do is grab the post title & the excerpt inside some HTML tags which you can feel free to change. That’s all there is to it. 🙂
That’s it. As always let me know if there is something you need help with or if you have any suggestions etc. Thanks for reading & more soon.
138 Comments
derek
Thanks for taking your time and doing this Paul. Much appreciated.
Paul Robinson
No worries. 🙂