MongoDB: Getting Started Quick Guide
Today we are going to take a beginners look at MongoDB. We will go through a few of the commands used via the Mongo shell, and take a quick peek at the PHP driver that can be used to connect to MongoDB. I will not be looking at the argument between SQL & NoSQL.
First a small note. I am assuming you already have MongoDB available or you have installed it on your local machine. If you have not installed MongoDB you can ask your webhost or follow the instructions over on the Mongo website for installing on your computer. You may also want to check if you have the Mongo PHP driver installed as we will be using that later. If not, again ask your host or follow the PHP driver installation instructions over on the Mongo Website.
Also please note that there is no demo for this tutorial as sadly I do not have the space on my server to spare for setting up MongoDB.
MongoDB: The Mongo Shell
I love TV & Film so we are going to make a celebrity database and in honor of the ever famous IMDB we are going to call it FCDB or The Fake Celebrity Database. You can follow along if you wish as I will be writing out all of the commands I use to insert data.
First we are going to open up the Mongo shell. If you are using Windows open a command prompt and type mongo while in the bin folder. If on other systems you may be able to just type mongo to open the shell.
Now we are going to create our database. Mongo does not need to be told to create databases or collections (collections ~ tables) you just use or write data to them & Mongo creates them as you go. So to create the database we just ask Mongo to use it.
|
1 |
use fcdb; |
I’ve called our database FCDB to match our fake site. Now let’s add some data to our new database.
|
1 2 3 4 5 6 7 8 9 10 11 12 |
db.celebs.insert( { name: { first: 'yvonne', last: 'strahovski', real: 'yvonne jaqueline strzechowski' }, birth: new ISODate('1982-07-30T00:00:00Z'), height: 1.78, nationality: 'australian' } ); |
That’s all there is to inserting data. If you are familiar with JavaScript I’m sure you’ll be extremely familiar with the syntax used here.
You may have notice db.celebs.insert. Where did celebs come from? Well this is the name of our collection. I have decided to call it celebs, but you can call it anything you wish. Again MongoDB does not need to be told to create it (although you can if you wish).
As you can see you can make sub-documents to hold nested data. Here I am storing the celebrities’ name, both their screen name & their given name. I have chosen to store only their screen name in separate parts (first/last), but you could also store the given name in the same way if you should wish.
You can also generate dates, here I am using ISODate to create the date (which Mongo stores in Unix Timestamp format). You can also use new Date() which can take various human based dates (such as March 12, 1970) however I noticed that entering July 30, 1982 for Yvonne’s Date of Birth seemed to produce 1982-07-29T23:00:00Z. I’m not sure if this is a bug, or a quirk due to the way my local clock is set.
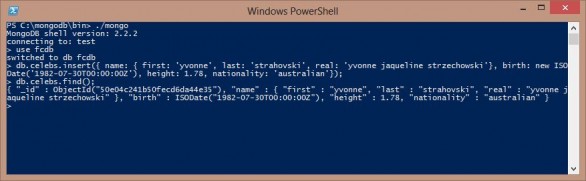
The commands mentioned entered into Mongo Shell.
As shown above, if you wish to see the information you’ve just entered you can use.
|
1 |
db.celebs.find(); |
find(); can be used with a query to pull back only the data you are looking for. For example to pull back only those with the first name Yvonne, seeing as she is the only person in the collection, you would use.
|
1 2 3 4 5 |
db.celebs.find( { 'name.first': 'yvonne' } ); |
You can also update documents via Mongo shell. Mongo’s update can seem a little strange at first, but is actually quite intuitive. Let’s say we found out that Yvonne is actually 1.8 meters tall. Let’s update our data.
|
1 2 3 4 5 6 7 8 9 10 11 12 |
db.celebs.update( { 'name.first': 'yvonne' }, { $set: { height: 1.8 } }, false, false ); |
First we limit our insert by using a query, in this case only where the first name is Yvonne. Then we set our data. The third & fourth parameters are set to false automatically but I’ve entered them to show they exist. The third is multi insert. Should it update all the matched documents. Mongo will only do 1 document automatically, set this to true to change all that match. The final parameter is upsert. That is update if the query yields a result, insert the data as a new document if it doesn’t.
You may have noticed that I’ve used dot syntax in the query to match a sub-document, note that using the same method as when inserting doesn’t seem to work when querying data. You may have also noted my lack of capitalization when entering data. This is because Mongo is case sensitive when querying, using all lowercase will make querying much easier. It is up to you to decide if you require correct capitalization when the data is stored or if it can be lowercased & then restored via alternative means before displaying the data.
That’s about all we are going to cover for the Mongo shell. There is db.celebs.remove() too, but that is self explanatory. Just add a query (like find();) & it will remove all that match, add true or 1 as a second parameter to remove only the first that matches.
MongoDB: The PHP Driver (PECL Extension)
Now let’s look at using the PHP driver to work with MongoDB. I’m not going to cover installing it as that could be a tutorial in itself. As mentioned earlier ask your host to install it for you, or feel free to do it yourself if you are able. I am also assuming you are using PHP 5+ and so will be using try...catch blocks within this next section.
With the data we’ve entered via the Mongo shell in mind, let’s query that data via PHP.
|
1 2 3 4 5 6 7 8 9 10 11 |
try { $m = new MongoClient(); $db = $m->fcdb; } catch ( MongoConnectionException $e ) { echo 'Could not connect'; exit(); } $collection = $db->celebs; $celebs = $collection->find(); var_dump(iterator_to_array($celebs)); |
So what’s going on here? Well first we open a try...catch if you’ve never seen one it is kind of like an if...else. It will try to execute the code inside the try block. If it errors it will trigger the catch block.
Back to the code. Inside the try we connect to MongoDB and select our database. If this fails it triggers the catch, we echo a basic error & stop PHP from parsing any further. This would not be ideal in production, but is fine for our purposes. In production you’d likely want to log the error, and throw a generic ‘something went wrong’ error to the user instead.
The next code selects our collection, celebs, and then grabs all of them using the find() method. Most (maybe all?) the methods available in the MongoDB PHP driver are analogous to the commands used via the Mongo shell.
Note the iterator_to_array() function. This copies the data in an iterator into an array for output. We are using it here for debug purposes. The MongoCursor class (that holds the data) does not retrieve all the data at once as MongoDB collections can sometimes be very large so it would be very unwise to store all the data at once. Instead it ‘lazy loads’ the data as it is needed. This is of note, but should not be a worry if you loop through the iterator with a foreach loop.
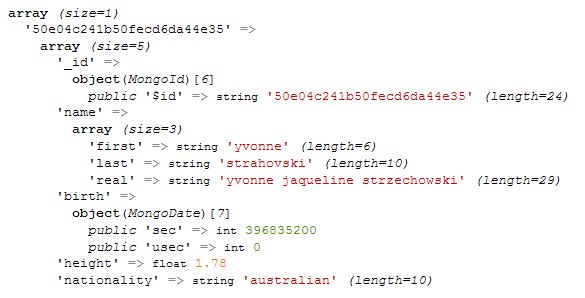
Data output from MongoDB via PHP.
As you can see, all the data we would get via the shell is available now via PHP. Your output may not be as pretty (unless you have xdebug installed) but you should have the same data (if you are following along).
Let’s add some more data via the Mongo shell so we can look into looping through our data.
|
1 2 3 4 5 6 7 8 9 10 11 12 13 14 15 16 17 18 19 20 21 22 23 24 |
db.celebs.insert( [ { name: { first: 'olivia', last: 'wilde', real: 'olivia jane cockburn' }, birth: new ISODate('1984-03-10T00:00:00Z'), height: 1.71, nationality: 'american' }, { name: { first: 'jewel', last: 'staite', real: 'jewel belair staite' }, birth: new ISODate('1982-06-02T00:00:00Z'), height: 1.66, nationality: 'canadian' } ] ); |
Here we use a batch insert. It’s as simple as using the same syntax as before, but inside a JavaScript style array.
If you refresh the page you’ve already made you will see your new data added to the dump output. Outputting the code in a sensible way is as simple as pushing the data through a loop like this:
|
1 2 3 4 5 6 |
//Code from before... foreach($celebs as $celeb) { if(isset($celeb['name']['first']) echo $celeb['name']['first']; //Etc, etc, etc... } |
I’m not the best at styling, as you all know, but here is what the information could look like when styled a little. It was output using very similar code to that shown above.
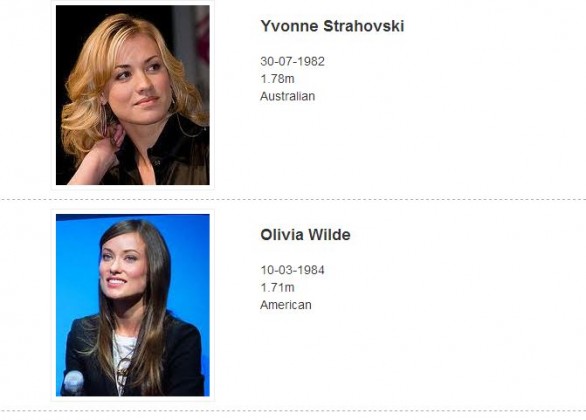
The data from this tutorial output onto a page & styled simply.
Again I want to make it very clear that I’m not necessarily advocating using this data with MongoDB, but I felt it showed the benefit of MongoDB’s sub-documents. Also if certain information (such as height, or real name) is not needed it can be omitted without any adverse effects, due to Mongo’s schema-less nature. Though all that is not to say you shouldn’t use this data in Mongo either.
I’ve tried to cover as much as I think is needed to get a decent grasp of MongoDB. As mentioned in the title this is only supposed to be a getting started guide. If you have anything that you are confused about, or you have any tips you’d like to give to those just starting out with MongoDB please feel free to do so in the comments.