Adding TinyMCE Button To WordPress Via Plugin Part 2
In our last post we added a TinyMCE button to the Visual editor of WordPress, but it didn’t really do anything except open up a modal container with a webpage inside. Now we are going to continue on & actually make it do something.
What Will It Do?
Well to keep it simple we are going to have it build the WordPress Gallery Shortcode using a friendly UI rather than having to write it manually. You can have it do practically anything, but we need to keep things simple to stop it becoming over complicated.
To complete our plugin all we really need to do is create that pesky HTML page to actually have it do something useful. Create an HTML file that’s name matches the ‘file’ part of your JS from the previous tutorial:
|
1 2 3 4 5 6 7 8 |
ed.windowManager.open({ file : url + '/example.htm', //This line width : 450 + parseInt(ed.getLang('example.delta_width', 0)), height : 450 + parseInt(ed.getLang('example.delta_height', 0)), inline : 1 }, { plugin_url : url }); |
Hopefully that makes sense. You can either name the HTML file & then change the file parameter or vice versa.
Now let’s get on to the HTML. It’s pretty simple HTML to be honest.
|
1 2 3 4 5 6 7 8 9 10 11 12 13 14 15 16 17 18 19 20 21 22 23 24 25 26 27 |
<!DOCTYPE html> <head> <title>Create Gallery Shortcode</title> <script type="text/javascript" src="https://ajax.googleapis.com/ajax/libs/jquery/1.7.1/jquery.min.js"></script> <script type="text/javascript" src="../../../../../../wp-includes/js/tinymce/tiny_mce_popup.js"></script> <script type="text/javascript"> //More JS Here Later </script> </head> <body> <form id="GalleryShortcode"> <p> <label for="GalleryPostID">Post ID (Leave blank for current post):</label><br/> <input id="GalleryPostID" type="text" value="" /> </p> <p> <label for="GalleryColumns">Number of Columns:</label><br/> <input id="GalleryColumns" type="text" value="" /> </p> <p> <label for="GallerySize">Thumbnail Size (Leave blank for thumbnail):</label><br/> <input id="GallerySize" type="text" value="" /> </p> <p><a href="javascript:GalleryTiny.insert(GalleryTiny.e)">Create Shortcode</a></p> </form> </body> </html> |
You may notice I’ve used the HTML 5 doctype, this was just to keep it simple, but it should be perfectly valid. Also I’ve attached jQuery from Google, and I’ve included the tinyMCE popup script that is needed to control the modal window. I’ve had to use a relative path, since the modal dialog is ran from inside your plugin folder and I couldn’t think of any other way to get the path to the file.
One extra thing to note is the Javascript trigger on the hyperlink at the bottom of the form. This triggers the function we are going to look at next.
Now. This file won’t do much without some extra Javascript so let’s take a peek at that.
|
1 2 3 4 5 6 7 8 9 10 11 12 13 14 15 16 17 18 19 20 21 22 23 24 25 26 27 28 29 30 31 32 33 34 35 36 |
var GalleryTiny = { e: '', init: function(e) { GalleryTiny.e = e; tinyMCEPopup.resizeToInnerSize(); }, insert: function createGalleryShortcode(e) { //Create gallery Shortcode var postID = $('#GalleryPostID').val(); var columns = $('#GalleryColumns').val(); var size = $('#GallerySize').val(); if(size == '') { size = 'thumbnail'; } var output = '[ gallery '; if(postID) { output += 'id="'+postID+'" '; } if(columns) { output += 'columns="'+columns+'" '; } if(size) { output += 'size="'+size+'" '; } output += ']'; tinyMCEPopup.execCommand('mceReplaceContent', false, output); tinyMCEPopup.close(); } } tinyMCEPopup.onInit.add(GalleryTiny.init, GalleryTiny); |
PLEASE NOTE: there should not be a space on line 17 before ‘gallery’. It is there to stop the shortcode from being parsed by WordPress.
This code goes inside the script tag from our earlier code. I’ll post the entire code at the end of the tutorial, so don’t worry if you are looking to copy & paste. Now let’s explain the code a little.
We create an object as that is what the TinyMCE onInit requires. We need to define a couple of items in this object. The first is a placeholder object which will allow us to grab what the user selected. This is for TinyMCE plugins that require a selection to work.
Next is again to allow us to use the users selection, should your plugin require it. To grab the users selection you just need to use GalleryTiny.e.selection.getContent().
Next is the actual function that will do whatever it is your plugin is meant to do. In our case it creates a gallery shortcode using the options set in the modal dialogue. I’ll explain the code in this function a little, but it may not help much as the code will need to be different to do whatever you need it to do.
Basically we grab to information from the form, and create a gallery shortcode using the data, or lack of data, provided. The important functions needed inside this function is the two tinyMCEPopup functions. The first replaced the content with your newly created content, and the second shuts the modal window & jumps you back to the editor.
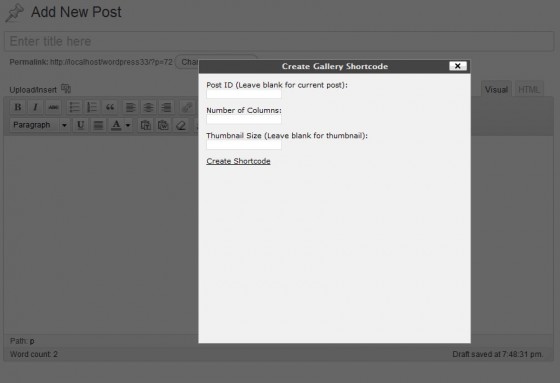
I know you all like a an example, but I can’t really give one since TinyMCE is within the WordPress admin. I can however give you some more screenshots showing what you’ll end up with. First what the modal dialogue looks like with the form fields inside.

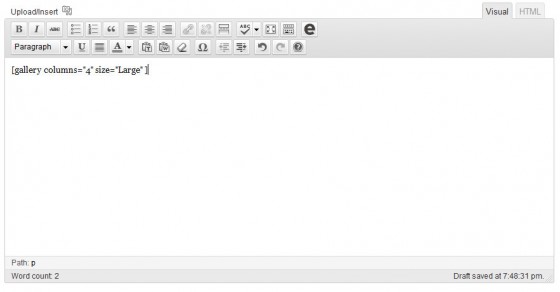
Finally the shortcode generated by the modal dialogue.

Hopefully these two tutorials have helped you understand how to add a TinyMCE button to the visual editor. Whether it be for a plugin you’ve wrote, a theme you are creating, or maybe just so a client can enter the same code without the tedium of constantly writing it. Whatever the use I hope it’s helped in some way.
If you have any questions, please feel free to ask them in the comments below, or if you like the personal touch I’m available for hire. Check out my Hire Me page for more details.
18 Comments
mark
nice post, its really helpful, thanks!
Paul Robinson
Thanks Mark, glad you found the post helpful.
Mel
Thanks paul for this post, i found it really useful.
Paul Robinson
No problem. Always happy when my tutorials are helpful. 🙂
vDev
Thanks for sharing this tutorial. It’s a very user friendly solution. Is it possible to post the JS file with the additional gallery params? Not exactly sure where the code falls within the earlier JS code. Thanks.
Flickapix
Nice tut, how would we change the position of the trigger button from tinymce to alonside the media upload buttons? Seen this on a shortcode plugin and looks so much better
Jamie
Nice tutorial. This is helpful. May I recommend a part 3. That is to show how to build a menu of options for shortcodes, then you select one shortcode in the list and it inserts the code into the post
Paul Robinson
Hi Jamie,
Thank you. Glad it was helpful.
I’m not sure what you mean by a list of shortcodes. Do you mean show how to list all the shortcodes registered within WordPress?
Aan
Hi Paul, nice tut.
Tried it but it’s does not seem to work. When I create “create shortcode”, nothing happen. Can you please provide full code or working version plugin for this tutorial. Thanks a lot
Paul Robinson
TinyMCE is extremely tricky to get working. I’ve been really busy with work recently & have loads more to do, but I’ll try to get a package up with the plugin in for you soon.
In answer to your other question. You can, but you need to load WordPress again because you are loading the file separately from WordPress so none of it’s functions are available. You can load WP inside the file using this:
You’ll need to adjust the relative path based on the PHP file you are in and where wp-load.php is relative to the file.
Aan
Also, is it possible to use *php as shortcode panel instead of *htm so we can use default wordpress absolute path (get_template_directory)
Daniel Nice
Thanks for the great tutorial, this has helped me a ton!
Wilson Muñoz
I just want to thank you, very nice post, really really helpful.
Ben
Paul,
I know this is a really old post as the interwebs are concerned. I’ve been on my own plugin with a tinymce modal. I wondered, is there any way that you are aware of to leverage wp language translation functions in the strings in the modal window? even if make that modal php and require wp core, will the modal itself be translated?
cheers for your thoughts,
ben
Paul Robinson
Hi Ben,
I believe the best way to do that is still to load WordPress into the modal & yes I believe you do get access to translation functions as it loads the entire WordPress core (I believe). I know the way in which you load WordPress on an external page changed in V3. Here is how you load it:
Obviously the path to
wp-load.phpwould need to be figured out. Afterwards you may want to check ifABSPAHhas been defined as that normally signified WordPress has been included successfully.If you need any further help give me a shout via comment or email & I’ll be happy to see what I can do.
Raj
Hey, nice post. Where is part 1?
Also, rather than a shortcode, i want the form to output the HTML. for example…
if I state i want to show a class name which is blue, i would expect the styles from the blue css styles to show without the raw HTML.
.blue {
background:blue;
border:1px solid red;
}
Paul Robinson
Hello Raj,
You can find part one here: Adding TinyMCE button to WordPress via a Plugin part 1
I’m not too sure I understand? You can use the code to have the pop-up output anything you want. It doesn’t have to be a shortcode as I have done here. You just replace what is stored in the
outputvariable.I think I might be misunderstanding what you are looking for though. Can you explain further?