Stacked Photo Gallery Using JQuery & CSS3
Like I said in the intro this is probably not ready to use on a production site. If you do choose to use it, it is at your own risk. I don’t think anything bad will happen, it just doesn’t work well (or at all) in older browsers. Think of it as either a learning experience, a look at things to come, or a tech demo.
Here is a look at what we are making, and you can try it out below the image. Just make sure you have an up-to-date modern browser or it won’t look it’s best.

Note: Please note that this only seems to work well in the newest browsers. Here is a list:
- Firefox 3.6 – Animation can be sluggish but otherwise works well.
- Chrome 11 – Works very well, could do with anti alias on rotated elements.
- Internet Explorer 8 – Animation works well, however no rotation or box shadows.
- Opera 11 – Works well, but borders seem to have a strange transparency issue.
- Safari 5.0.3 – Works very well although animation is not as smooth as others.
As you can see it is similar to a stack of Polaroid’s, and the idea is that we flip through the images one by one placing the one in the front at the back when you click on it.
Right, let’s get to the code. First though a little note. This is a prototype. I made it while playing around with jQuery and some images. I might come back to it every now and again & try and add things to it to make it better, but for the minute I’m happy. Feel free to suggest things or even improve on my code. If you do use any of the code I’d appreciate an acknowledgement, although it isn’t necessary.
Stacked Photo Gallery: HTML
Let’s first take a look at the HTML I used.
|
1 2 3 4 5 6 7 8 |
<div id="photos"> <img src="/examples/assets/JPEG/001.jpg" alt="Image 1" /> <img src="/examples/assets/JPEG/002.jpg" alt="Image 2" /> <img src="/examples/assets/JPEG/003.jpg" alt="Image 3" /> <img src="/examples/assets/JPEG/004.jpg" alt="Image 4" /> <img src="/examples/assets/JPEG/005.jpg" alt="Image 5" /> <img src="/examples/assets/JPEG/006.jpg" alt="Image 6" /> </div> |
Obviously you would replace the paths with your image paths, but that is all the HTML you need to make this work.
Stacked Photo Gallery: CSS
Normally CSS is just to make things look nice, but in this case we need a few CSS rules or the script won’t work properly. Let’s take a look:
|
1 2 3 4 5 6 7 8 9 |
#photos img { position: absolute; width: 300px; border: 15px solid white; box-shadow: 1px 1px 1px #010101; -moz-box-shadow: 1px 1px 1px #010101; -o-box-shadow: 1px 1px 1px #010101; -webkit-box-shadow: 1px 1px 1px #010101; } |
I have highlighted the lines of CSS you must have for the script to work. The others are some nice CSS 3 styling (with the exception of border) to make things look nice, feel free to customize. Obviously the width is customizable too, just remember the image will move out to the right approximately it’s own width to go behind the other.
Stacked Photo Gallery: jQuery
Now let’s take a look at the juicy jQuery code that runs the whole thing.
|
1 2 3 4 5 6 7 8 9 10 11 12 13 14 15 16 17 18 19 20 21 22 23 24 25 26 27 28 29 30 31 32 33 34 |
$(function() { $('#photos img').each( function(i) { var img = $(this); var count = $(img).parent().children().length; var angle = Math.floor( Math.random() * 3 - 3 ); $(img).css( 'z-index', count-i ); $(img).css( 'transform', 'rotate(' + angle + 'deg)' ); $(img).css( '-moz-transform', 'rotate(' + angle + 'deg)' ); $(img).css( '-webkit-transform', 'rotate(' + angle + 'deg)' ); $(img).css( '-o-transform', 'rotate(' + angle + 'deg)' ); $(img).load( function() { // If we don't center after images are loaded we don't get true center. $(img).css('top', ( $(window).height() - $(img).outerHeight() ) / 2 + "px"); $(img).css('left', ( $(window).width() - $(img).outerWidth() ) / 2 + "px"); }); $(img).click( function() { $(img).animate({ left: ( '+=' + $(img).outerWidth() + 'px' ) }, 500, function() { $(img).css('z-index', 0).animate({ left: ($(window).width() - $(img).outerWidth() ) / 2 + 'px' }, 500, function() { $(img).parent().children().each( function(i) { $(this).css('z-index', ( $(this).css('z-index') + 1 ) ); }); }); }); }); }); }); |
Okay, now let’s go through the code a bit at a time. I wanted to make it so that you would only need to change one piece of code should you want to use a different element ID. I may have ended up using some ugly hacks, so if you have any alternatives please let me know. I’m still learning jQuery as I haven’t been using it for as long as I have PHP.
|
1 2 |
$(function() { $('#photos img').each( function(i) { |
First up we have our obvious DOM ready code so we’ll skip that.
Next we select our images, that’s the customizable bit should your element have a different ID, and use each to run the code contained within the function once for each image element. The i is a counter which is incremented automatically every time the loop starts again.
|
1 2 3 |
var img = $(this); var count = $(img).parent().children().length; var angle = Math.floor( Math.random() * 3 - 3 ); |
Now we store the reference to the image element so we can always reference the current image element.
Next we store the number of images we have by starting at the current image, moving out to it’s parent (the #photos element), moving back down to the images and getting the length. This may seem pointless, but if we ask for the length of the current image element it will return 1. However if we do all that instead we get the total number of images held by the holding element, which in our case is #photos.
The final piece of code produces a random angle between -2.7 & -0.3, how I don’t know as I’m not very good at math, but feel free to customize as you like if you are. I’d recommend, however, not having it too high an angle (or variance) or it looks a little strange.
|
1 2 3 4 5 |
$(img).css( 'z-index', count-i ); $(img).css( 'transform', 'rotate(' + angle + 'deg)' ); $(img).css( '-moz-transform', 'rotate(' + angle + 'deg)' ); $(img).css( '-webkit-transform', 'rotate(' + angle + 'deg)' ); $(img).css( '-o-transform', 'rotate(' + angle + 'deg)' ); |
Now we set our z-index. This is the part that allows us to make it look as if the picture is being shuffled to the back of the pile. We set our starting z-index by taking the number of images and taking away the current number i is up to. This way our images still display in the order they are written in the HTML code. If we had just used i we would have ended up with our images displaying in the opposite order.
Finally we set our random angle for the image using all the different browser variations to cover all the bases.
|
1 2 3 4 5 |
$(img).load( function() { // If we don't center after images are loaded we don't get true center. $(img).css('top', ( $(window).height() - $(img).outerHeight() ) / 2 + "px"); $(img).css('left', ( $(window).width() - $(img).outerWidth() ) / 2 + "px"); }); |
This is to stop a small quirk. Because the images haven’t yet loaded when this centering code runs the element sizes aren’t correct yet and your elements don’t end up in the center of the screen. To fix that you run the center code in a load event. This is triggered after the image has finished loading.
|
1 2 3 4 5 6 7 8 9 10 11 12 13 14 15 |
$(img).click( function() { $(img).animate({ left: ( '+=' + $(img).outerWidth() + 'px' ) }, 500, function() { $(img).css('z-index', 0).animate({ left: ($(window).width() - $(img).outerWidth() ) / 2 + 'px' }, 500, function() { $(img).parent().children().each( function(i) { $(this).css('z-index', ( $(this).css('z-index') + 1 ) ); }); }); }); }); }); }); |
This final bit of code does all the animation when you click the images. Obviously we bind a click event to the image. Next we set up an animation to move the image out to the right by the exact width of the current image. When that is finished we set the z-index to zero (moving it behind all the other images) and then animate it back to the center. When that has finished we run through all the images again shifting their z-index’s up by 1.
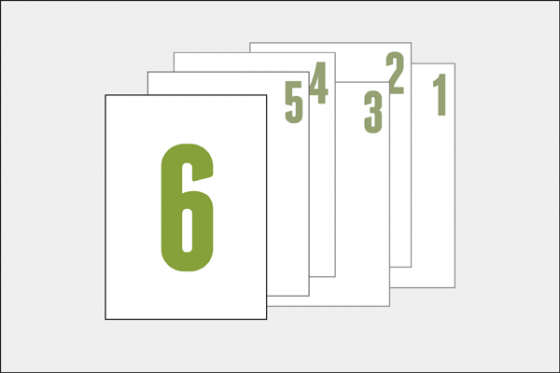
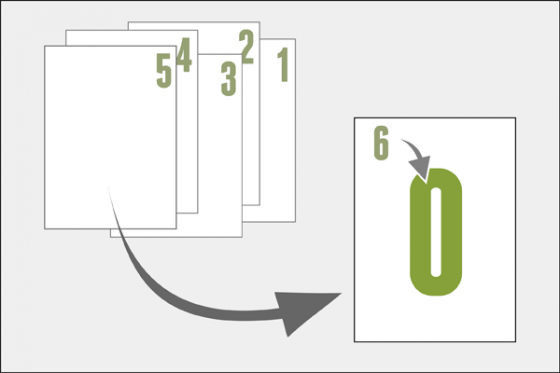
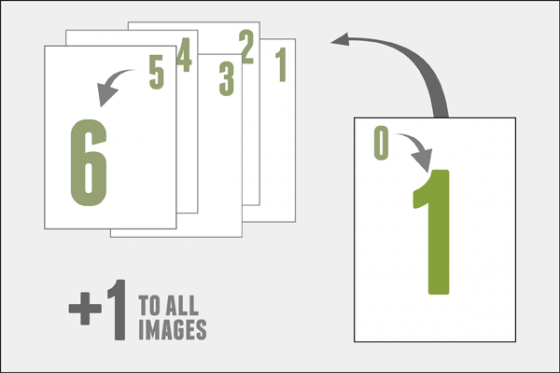
The whole thing can get a little complicated so to explain it better I’m going to use three illustrations my sister over at Lisa Marie Art & Illustration cobbled together for me.

As you can see the images start off numbered 6 to 1. This is because z-index shows the highest number on top.

We take the front most image (number 6) and move it out as part of the animation. While it’s out we shift it’s z-index to 0 moving it behind all the other images.

Finally we move the image back to the center, but because it’s z-index is now 0 it appears to go behind all the other images. Next we run through all the images & shift their z-index up by one. This creates a never ending loop of z-indexes that will never reach above the maximum number of images you have, and also stops all your images from ending up with their z-index as 0 which would stop the effect from working.
Stacked Photo Gallery: All Done
That’s it. While this is probably not ready to be used out there in the big world wide web on production sites, it’s still a nice look at what might be possible soon thanks to the leaps in browser technology.
As I said earlier, if you have any suggestions for improving the code, or you have any questions let me know & I’ll try my best to answer them.
Images used in demo are from Chuck Versus Phase Three. © NBC Studios. No infringement intended. Used for illustrative purposes only.
3 Comments
tyler
Paul, this is really cool! Nice work! I wish I had a project going on where I could use this. 🙂
Paul Robinson
Thanks Tyler. 🙂
I was just playing around a bit. I needed to brush up on my jQuery skills and this is what I ended up with.
Glad you like it though. Feel free to suggest anything you think might make it better. 🙂
alireza
hi paul, your tutorials are really good and helpful .. tnx .. can i share these in my blog with your name ?!