Setting Up XAMPP & WordPress For Local Testing
You might be asking: “Why do I need to do local testing?” Well the answer is you don’t, but I would strongly advise that you do. Whether you are a first user of WordPress, or you are a budding developer & want to create plugins and/or themes a local environment is an excellent place to test things out without allowing the world to see.
So now that we’ve gotten the why out of the way, let’s take on the how.
Setting up XAMPP
While there are plenty flavors of local server to use, my personal favorite is XAMPP and is the one I’m the most familiar with. If you want to use a different flavor, while the installer will be different, the instructions (for the most part) should hold true.
Downloading XAMPP
Okay, so the first thing we need to do is to download XAMPP. You can always find the latest install of XAMPP for windows here. You’ll probably want the EXE from the basic package section. I am not responsible for links to external content or downloads from said links.
Installing XAMPP
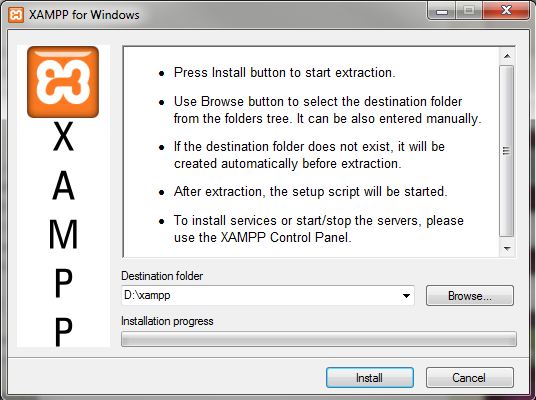
To install XAMPP is fairly simple, you just need to follow the instructions provided by the installer. I find it’s best to change the install directory to a different hard drive if possible so that you do not lose your important data should you need to reinstall windows.
Once the extraction is complete XAMPP should automatically set everything up. Once you get the control panel up decide if you want Apache & MySQL to start automatically when you start your computer, if you do click the Srv (Service) check box next to both. You don’t need the others running.
Checking XAMPP Install
Now let’s make sure XAMPP is working. Open up your browser (IE, Firefox, Safari etc) and go to http://localhost if you are taken to the XAMPP splash then everything is working.
Setting Up WordPress
Now that we have XAMPP installed let’s get to installing WordPress.
Downloading WordPress
First you’ll need to head to the WordPress site to download it. Once you’ve done that browse to your htdocs folder which will be in the location you installed XAMPP earlier. Create a new folder there with whatever name you like, for this tutorial we’ll use ‘wordpress’. Open up the zip and extract the contents of the wordpress folder you find inside to the folder you created.
Creating A Database
Now before we continue with the installation of WordPress we need to create a database for WordPress to install into. To do that go to http://localhost/phpmyadmin and find the text box underneath ‘create a database’. Pick a name, for this tutorial we’ll again use ‘wordpress’, and put it in the box then hit create.

Installing WordPress
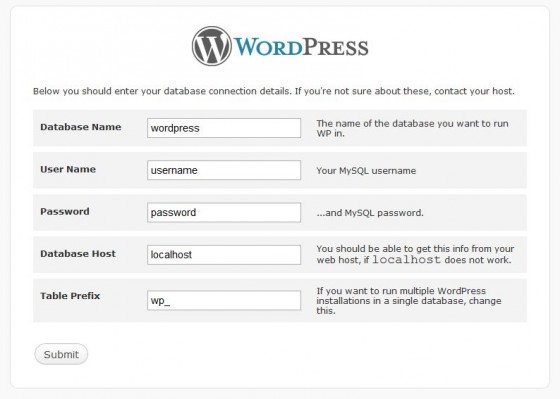
We’re nearly done, now we just have to run the WordPress installer. Just put http://localhost/wordpress where ‘wordpress’ is the name of the folder you created to put the WordPress files (remember I used wordpress). You’ll probably be faced with a error page, just hit the big ‘Create a Configuration File’ button. Then follow the instructions until you reach a page that looks like this.

This is where most people have trouble. The database name is the same as what you wrote into the ‘create a database’ text box before. In my case ‘wordpress’. The username is normall ‘root’ & password is blank, this is only true for those who have not customized their MySQL login settings. The host is ‘localhost’ and it is safe to leave the prefix on ‘wp_’.
On the next page just fill in the details as instructed and you’re all done.
All Done!
That’s it, you should now have a fully functioning localhost with WordPress already installed. You are now free to play around or develop till your hearts content. Good stuff, huh?
As always if you have any questions, comments, or problems with anything mentioned in this tutorial leave a comment & I’ll get back to you ASAP. Also if this all seems like to much for you I am available to do WordPress installs, just use the contact page to drop me a line with as much info as possible & I’ll get back to you.

5 Comments
Pierre-Yves Brisson
Hey Paul,
For more autonomy, did you ever tried to use XAMPP packages separately?
Download Apache Binaries, PHP Binaries and MySQL for Windows, deploy, and ta-dah! Along with /etc/hosts file, you can emulate anything you want on the Web!
Much recommended for development… I first develop my blogs and project locally on Windows, then send them to my Linux boxes! 🙂
Great article! Thank you so much!
Paul Robinson
Nope never tried it that way since I already have a Linux box to test on.
I just develop on XAMPP through shear laziness since I installed it years ago on an external drive (when I first started developing) & I just keep updating it.
Also a lot of people like simple installers, so this tutorial is really aimed at them. I like your idea though, could really be handy for those that like customization. I might even get off my lazy backside & try it myself. 😛
Pierre-Yves Brisson
Thanks for your feedback!
And you’re right… I must stop trying to reinvent the wheel everytime I can! 🙂 But that’s just me.
With your permission, I’ll use this tutorial for a few of my clients (Keeping the copyright notice of course)! Some of them wanted an introduction to WP – I’ll make them do the real thing… 🙂
Paul Robinson
Hehe. No problem.
Sure, as long as you link back to us (as you have said you would) feel free to use the tutorial. 🙂