Beginners Guide: Using Vagrant with Puphpet for Local Development
Whether you’ve been developing locally for years, or you are just getting started, but have always used a locally installed server such as XAMPP or WAMP (or MAMP) it might be time to move on to a more flexible development environment.
Why Use Vagrant?
Vagrant is excellent for development because it creates a virtual version of a real server. It actually runs a version of Linux (or any other development environment), and therefore is therefore near identical to developing on a VPS you might get from a hosting company. This is excellent as it allows you to see how the application would run on the production server, if you install the application versions present on the final production server.
Using Vagrant is also very convenient. Are you regularly needing a development environment running PHP 5.6, Nginx, NodeJS (for use with Grunt, Bower etc) and Python pre-installed? Not a problem. With Vagrant itself though you would have to write the vagrant file to do that for you. Vagrant is written in Ruby, so if you are unfamiliar with the language that can be a bit of a struggle.
PuPHPet To The Rescue
That’s where PuPHPet comes in. PuPHPet allows you to generate a package that contains all the needed code to create a virtual machine exactly as you decide on PuPHPet’s website. All you need to do is provision it.
Now that we’ve looked at what Vagrant & Puphpet are, let’s get on with a tutorial showing you exactly how to set up your very first virtual machine. I’m going to assume you are running on Windows, but Vagrant works well on Linux & Mac too. I will try to provide instructions for all OSs but the instructions shouldn’t differ too much throughout.
Prerequisites & Notes
Before we start there are a couple of things to note.
VirtualBox saves your VM into it’s VirtualBox VMs folder regardless of where you locate your actual VMs config & files. This means you must have enough space on your file system drive to store the disk image. The location can be changed by opening VirtualBox (once installed), opening preferences and changing the ‘Default Machine Path’.
Vagrant also saves it’s boxes, these are the disk images used to install your OS of choice, into it’s .vagrant.d folder located in your users home directory. These can also be pretty large. If you want to change this you can via Vagrant’s VAGRANT_HOME environment variable. The steps for this on Windows are long and are outside the scope of this tutorial, you can however take at the top rated answer on this SuperUser question which gives a good description of it.
Please do both of these after installing, but before making your first VM. It is much easier to set your location before hand than it is to move them later.
Create A Location
You first need to choose where to place your virtual machine (from here on shortened to VM). I have placed mine in a folder called server on my Windows drive (because it is a SSD), but you can place it on a different drive if you like. It makes no difference to Vagrant. Once you’ve decided where you want your VM to live create a folder there for it.
Note: For the rest of this tutorial I will assume the path C:\Server for the location of your VM. Please replace as needed when following along.
Install VirtualBox
Before you can create a VM you need something to create the VM. That is exactly what you use VirtualBox for. There are other premium VM providers out there, but VirtualBox is free and is fast enough for most web development uses. On the VirtualBox website download the version relevant to your OS. If you are on Linux you can install it through your package manager.
Install Vagrant
Now we just need to install Vagrant which magically (okay, it’s not magical, but still) installs all of the programs you requested onto your VM. Head on over to Vagrant and again pick the version relevant to your OS. Linux users will want to choose the correct file for your distro. DEB for debian based systems like Ubuntu, RPM for RedHat based systems such as openSUSE or Fedora.
Create PuPHPet Config
Now you have the programs needed installed let’s get to creating our PuPHPet config. Head on over the PuPHPet website. Now the settings you choose here depend on what you need from your VM, but I’m going to show you the settings I choose for my PHP development VM.
127.0.0.1 (since 1.2.3) so only your computer can access the VMs data. However feel free to use randomized passwords or the ever famous XKCD style passwords like ‘CorrectBatteryHorseStaple’.Deployment Settings
On the first page you just want to change your Linux distro to your preferred one. If you do not know, or have no preferred distro I advise swapping it to “Ubuntu Trusty 14.04 LTS x64”. That is the latest Long Term Support version of the 64-bit version of Ubuntu. I’ve used it for quite a while now & it has always worked well and been very stable. You can leave all the other settings as they are.
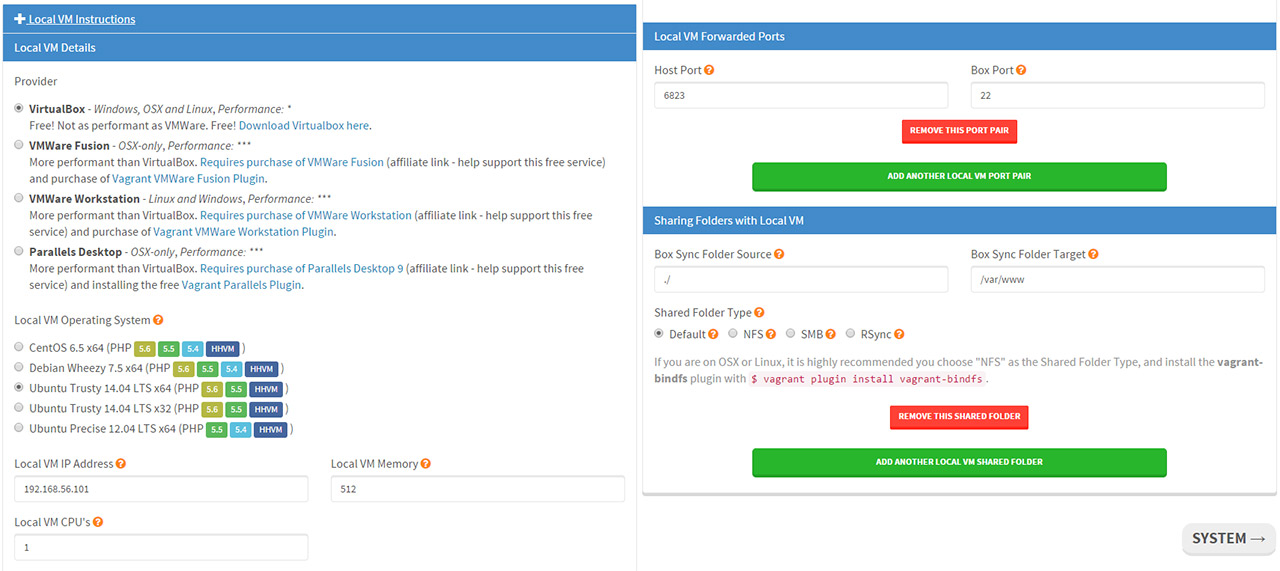
Once you are happy hit the ‘System’ Button at the bottom.
System Settings
You can leave this section without altering it, unless you know you need extra users/groups and/or packages installed. Just go to the bottom and hit the ‘Firewall Rules’ button.
Firewall Settings
Again, you can leave this section unless you know you need to open extra ports on the Firewall. Since this will be an exclusively locally used VM there is generally no need to do anything here. Just jump to the bottom and click ‘Web Servers’.
Web Server Settings
Here you get to decide which Web Server to use. I personally use Nginx so I turn off Apache2, click Nginx and then tick the Nginx box instead. Choose whichever you are comfortable with or whichever is required for your project. Under that section you can setup your first virtual host. If you need more than one you can set them all up here now or you can add them manually later (we’ll cover that later in a later tutorial). Just change ‘Server Name’ to the address you wish to use to connect, you can remove the alias or just add ‘www’ to the front of the ‘Server Name’ you chose. Finally just make sure you chose a folder name under ‘Document Root’. I generally keep it the same as the domain name just to keep things simple.

Once you are happy with your Virtual Hosts hit the ‘Languages’ button at the bottom.
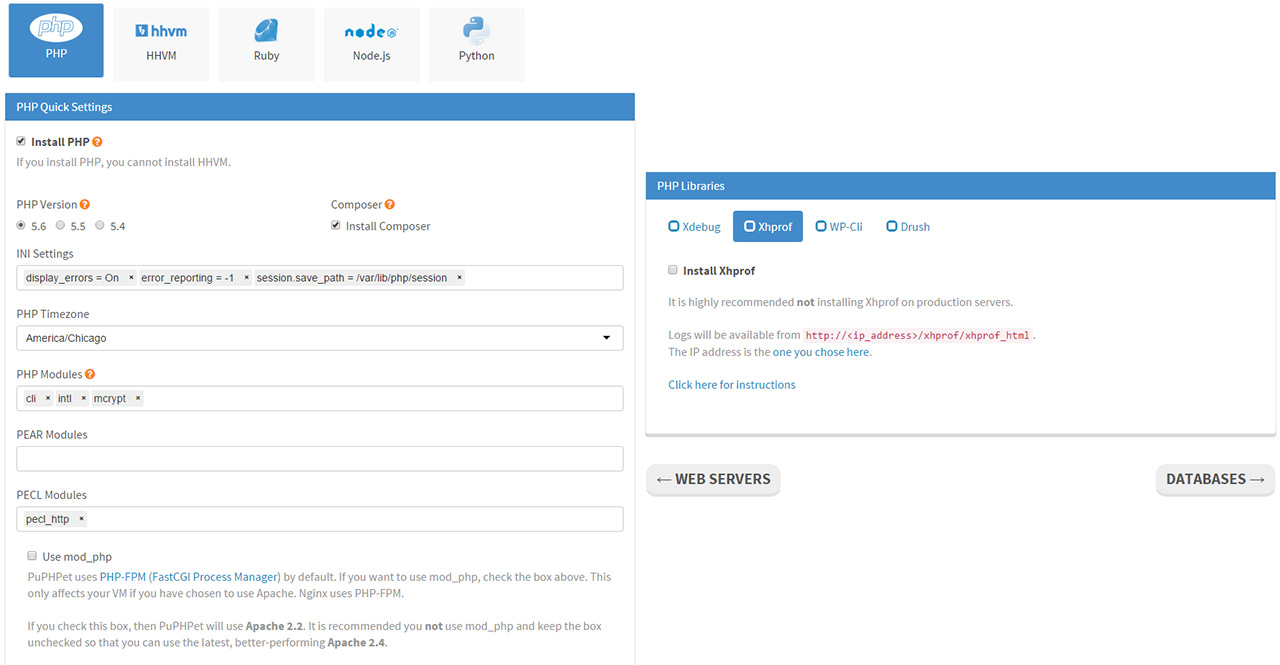
Language Settings
Here I would advise just leaving PHP as it is set. Unless you have a need for it or wish to learn about it then leave HHVM alone, you can’t install both PHP-FPM and HHVM anyway. Ruby and Python come pre-installed should you need those. Also if you plan to use Grunt or Bower you may want to tick NodeJS too. You can always install it via APT later but why not let it install it for you.
At the bottom of the PHP section I advise installing XDebug. Also if you are going to be working with WordPress WP-CLI is handy to have installed.
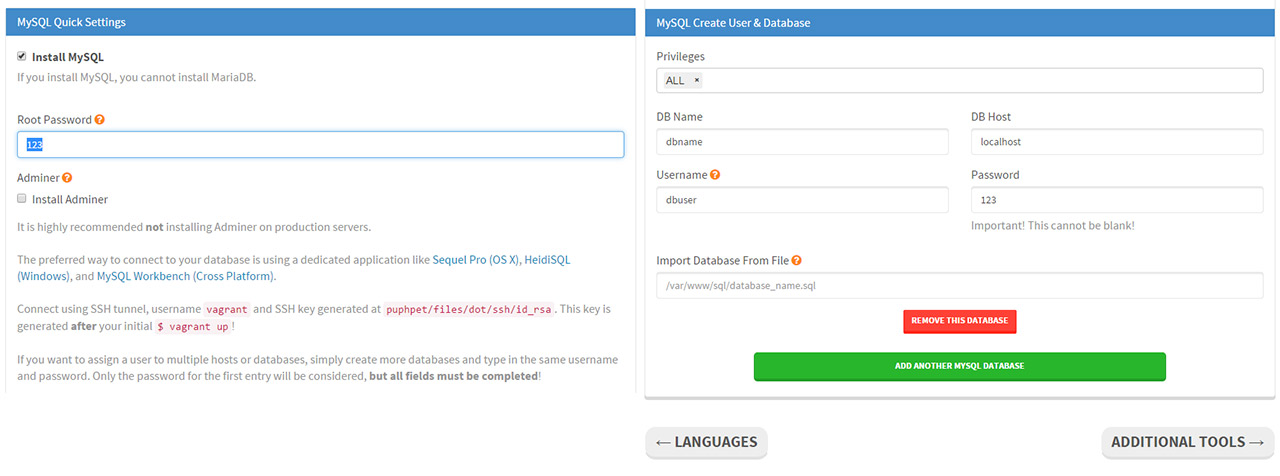
Database Settings
Again if you don’t require any alternative databases I would advise just using MySQL here. One extra thing though would be to tick ‘Install Adminer’. It is a handy lightweight alternative to PHPMyAdmin. We are only doing so because this is a development install. Do not install it if you are planning to use this config to set up a production server. If you have an administrative application like MySQL Workbench then feel free to omit installing Adminer and use that instead.
At the bottom enter some database information. You don’t need to enter a super secure password here since this is a local development install and your machine is likely not publicly accessible from the internet. Unless of course you work in an office and don’t trust other members of staff. In which case feel free to beef it up.
Additional Tools
Unless you have a need for any of these I would advise missing them out. As such I’m not going to cover them in this tutorial. If you do plan to work with mail in your local development though Mailcatcher will be handy to install.
Create
Just hit the ‘Make it’ button and you will be able to download a zip file with your newly made VM config inside.
Setup Your VM
Now you need to extract the zip into the folder you created way back at the start. I would advise extracting the whole zip and renaming the folder you find inside, that way you can have more than one VM if you need another for a different setup.
Open yourself a terminal, or Command Line. That’s Ctrl+Alt+T on Ubuntu, Cmd+Space then type ‘Terminal’ on OSX. If you are on Windows (7 or 8) you will need to open a Command Line with Administrative Privileges. On Windows 8 you can hit the Windows key, type ‘CMD’, then hit Ctrl+Shift+Enter to open it as Administrator.
Once you have it open navigate to the location you just extracted your zip file too. In my case this would be cd C:\server\folder. If you installed on a different drive you will need to use cd /D G:\server\folder changing G for the drive letter. This is for Windows only. In Linux/Mac just navigate to your folder as normal using cd.
Once there just type vagrant up, hit enter and you can head off and grab a cup of coffee. After a little while you will hopefully be greeted with a message saying everything is finished. If you see the an issue with it constantly failing to connect to the VM then it may be the issue that had me face-palming for quite a while.
If you have an Intel or AMD based processor that supports it you must make sure you have the Virtualization Technology turned on in your BIOS (most performance friendly option). If you cannot turn it on then you will need to open VirtualBox and open the settings (Right-click) for the Vagrant VM that should be listed. Go to the ‘System’ section then the ‘Acceleration’ tab and turn both options off. Most processors created fairly recently should support it VT. If you do not have VT then do not worry, it is not required and you will likely not encounter the issue in the first place.
Last Steps
Before you can use your VM there are a couple of last steps. First if you want to use the domain names you setup as virtual hosts you will need to alter your computers host file to send you to the correct address. You can use a Vagrant plugin to do this automatically for you (Vagrant Hosts Updater) but it’s not something I feel comfortable leaving to a plugin.
If you are happy to allow a plugin to alter your hosts file you can install it using vagrant plugin install vagrant-hostsupdater. If not then just navigate to your hosts file:
- Windows:
C:\windows\system32\drivers\etc\hosts - Linux (Ubuntu):
/etc/hosts - Mac:
/private/etc/hosts
On Windows you will need to open Notepad with Administrative Privileges.
On Mac the best way is to use sudo nano /private/etc/hosts, you will have to enter your admin password then you can edit it in the terminal window. When finished hit Ctrl+x, then enter to save, then enter again to accept the filename. These are also the same steps for Linux users. Just replace the path with the one from the list above.
Now what do you need to enter into the hosts file? Well that depends on your Virtual Hosts. If we take my example. I chose the domain name project.dev so at the bottom of the hosts file you would add:
|
1 |
192.168.56.101 project.dev www.project.dev |
Add one of these lines for each Virtual Host you created during the config file creation on PuPHPet.
The IP address would be the address from when we created our config file on PuPHPet. If you don’t remember what it was, and you didn’t change it, then it will be the same as the one I have written here. If you want to check just open the folder you have been keeping your VM in, remember mine is C:\server\ go inside your VM folder, then go into the puphpet folder and open config.yaml in notepad. The IP you want is near the top next to ‘private_network’. There are a few ways to get the IP Address but I feel that is the least complicated for those just starting out.
Now you will be able to access the sites on your VM via your host computers browser. Just type the address into your browser. So I would type ‘project.dev’ in my browser.
To copy files & develop is simple. Just navigate to the your VMs folder. Again mine is C:\server\vmfolder, head inside the folder of your VM and then into the folder of your virtual host. Mine would be called project. That folder is your document root. So any file in there will be available to your browser.
Once you are ready to stop development for the day just type vagrant halt in a terminal/command line located inside the VMs folder. I advise remembering to do it before shutting down as I have encountered some corruption issues in the past.
Adding A New Project
Salih has asked in the comments how to add a new project without needing to create a new Vagrant box, that’s a good question.
If you need a different OS, or server setup then you will most likely need to create a new box. Say for example you need one for PHP development on CentOS, but you need another for Rails development on Ubuntu. You’re going to want to create two different Vagrant boxes for that. How about if you just want to work on two WordPress sites, or Laravel & a small Lumen website? Well for that we can just use the same box.
To make a new project you simply need to make a new virtual host. To do that all you need to do is change a few things in your puphpet/config.yaml file. Pull open the file and look for vhosts. If you are using Apache, you would need the apache section. If you use Nginx, you’ll need the nginx section. Then just grab a copy of your current virtual host, which might look a little like:
|
1 2 3 4 5 6 7 8 9 10 11 12 13 14 15 16 |
kE0A3sMG9HIQ: server_name: newproject.dev server_aliases: - www.newproject.dev www_root: /var/www/newproject listen_port: '80' location: \.php$ index_files: - index.html - index.htm - index.php envvars: - 'APP_ENV dev' engine: php ssl_cert: '' ssl_key: '' |
This is an Nginx virtual host block, Apache’s look a little different. Paste this directly below the ssl_key line. Change the key, the random string, to something different (but the same length), and make sure it is indented to the same distance as the other random string. If you don’t it will likely break as yaml is a off-side rule language that uses indentation instead of braces. Then change any of the options to what you need. In general you just need to change the server name & alias plus the root.
Now run down the file to the mysql section and under databases do the same thing. Here is an example of the block you are looking for:
|
1 2 3 4 5 6 7 8 |
UkdDLuVIjSuB: grant: - ALL name: newproject host: localhost user: newproject password: '123' sql_file: '' |
Once you’ve done that save & then head to your terminal/cmd and provision your new virtual hosts. If your VM is running just run vagrant provision, if it isn’t then it should do everything when you run vagrant up. If you find it hasn’t, not sure why it does it sometimes, then just run the provision command after your VM has come up.
The final thing is to add your new server name to your hosts file. Use the same method as you did for your first project & you should be able to get to your new project via a browser.
That’s all there is to it. You can now get developing. This tutorial is pretty big now so I’m going to stop here and cover SSHing into your VM via using PuTTY (for Windows users) in a later tutorial. I will add a link once it is available.
If you have any questions let me know & I’ll try to help out as much as I can.
9 Comments
Salih
Hi, I was looking for Vagrant tuts, this seems good to start again. I have a question, <> So whenever I start a new project Do I want to create a New VagrantBox? Is that boxes are the Copy of Linux(around 700MB)? If that is the case, How can we use Vagrant on a per project basis???
— Merged Comments —
My question was based on thes lines from your text, – –Vagrant also saves it’s boxes, these are the disk images used to install your OS of choice, into it’s .vagrant.d folder located in your users home directory. These can also be pretty large.–
Paul Robinson
Hi Salih,
I merged together your comments for you just to neaten things up.
That’s actually a really good question I should have answered in the tutorial. You have a choice when creating new projects.
If you need a specific server setup for your next project, then you’ll have to setup a new box as you may need CentOS instead of Ubuntu. That obviously requires a different OS and so will need to be a new box.
If, however, you are creating projects & you can happily leave everything the same there is a simple way to add a new project. All you need to do is open us your puphpet’s
config.yamlfile and add in a couple new entries. I’ll add it into the tutorial for you as while it is simple to do (once you know how) explaining is a little lengthy. Look out for it in the next couple of hours.Again thank you for the question.
Salih
wow,quick replay!!! 🙂 thats cool brother, Thanks a lot, I am looking for that.
Paul Robinson
No problem.
I’ve just updated the post (near the bottom). Hopefully that will help. If you do have any other questions or I haven’t explained everything well enough please just let me know & I’ll answer as soon as I can.
Marc
Hi,
Great tutorial! I tried the Vagrant Hosts Updater, but it didn’t add the apache servernames. Only the vms hostname. But Vagrant Host Manager did.
Regards,
Marc
Phone
Hi
Nice Tutorial! But I can’t seem to vagrant up. It keeps saying ” puphpet/ubuntu…:” could not be found.
Sincerely
Phone
Paul Robinson
Hi,
Hmm. Sounds like something is missing somewhere. The error is a little vague but it could be having trouble finding the box used to create the VM.
If it is an option I would try downloading another package from Puphpet and try again in another folder. That will give you a clean start and see if it is an issue with that particular Puphpet setup.
Kaiserlis Manolis
Hi!
I have certain questions on a real case study, I would appreciate your feedback or perhaps your help.
I have my wordpress website up and running on my live host.
I want to develop a new website, locally, using Vagrant to emulate my live hosts environment.
When everything is done and tested I want to upload it to live host. It can get tricky somehow having to change URLs so I want to avoid that.
So here is the question,
Can I setup the virtual environment, using my real domain name and alias (joyride.bike that is), in a way that I can just upload the files and the database on the live server and have the site alive and kicking out of the box, without any find & replace operations?
I think that if I use my local hosts file to assign the domain to the virtual server’s IP, before I start developing in wordpress, then all the pages, posts, files and URLs should have proper permalink strings attached to them, no mods necessary. Is this the case?
If that can be done I would have a testing environment exactly mirroring the live production site and any updates would be trouble free.
Thanks for the nice tutorial, I appreciate your answer to my question!
Paul Robinson
Hi,
Yes, that is definitely something you could do. The only caveat with using the same domain for both is that you will have to be extra careful when making changes (after deployment) to make sure you are actually making your changes to your local development site and not your live site (an vise-versa).
If you are able to manage those issues then it is definitely something you can do to prevent the need for URL changes.
Alternatively there are plugins like Velvet Blues out there that do a great job of changing URLs in pretty much everywhere (posts, pages, custom fields, etc).
There are other ways to deploy such as Capistrano, but they all need to do a find/replace on the database so if you aren’t comfortable with that idea then having a development environment with the same domain name is probably your best option.
Hope that helps.