HTML Compatible jQuery Typewriter
The requests for my jQuery Typewriter to allow HTML within the text have been flooding in, and as I said I had previously though it to be impossible, but it hit me earlier today that it is possible. Let’s take a look at a demo first.

At first glance it looks the same as the old jQuery typewriter, but you may have noticed that certain words in the first few lines were different colors. This was done using a <span> tag. If you aren’t familiar with how HTML & the typewriter works you’d be forgiven for thinking: “What’s so special about that?” Well I think it’s difficult to explain, but let’s give it a go.
HTML & jQuery Typewriter… The Problem
The main problem is that because the jQuery typewriter uses substr (or cuts) the text string to only show so much of it, it will always end up cutting the HTML tag too. Now that’s not too bad, all you need is something to tell the script to skip over HTML tags, right? Well no, not exactly.
The problem with just skipping over the opening HTML tag is that your tag is now left open until it reaches the closing tag. Not only can this cause problems with the rest of your page, since the CSS rules applied to that element will now effect everything below the unclosed tag, but it’s wrong from a good coding point of view.
HTML & jQuery Typewriter… The Solution
So, the solution? Well it’s to skip the opening tag as described before, but also to use that opening tag to fake a closing tag until the real closing tag is found. Sounds simple.
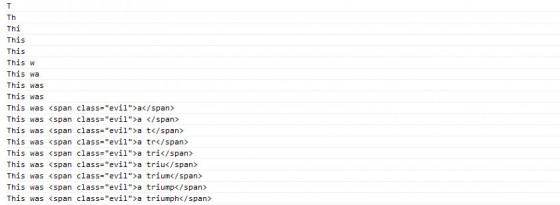
If you are having trouble imagining how this would work here is an a little picture to show how it works. If we take the text:
This was a <span class=”evil”>triumph</span>
Below is console output of how the completed typewriter script deals with the HTML as it moves forward each letter.
Now let’s take a peek at the full code, I’ll highlight the differences from the old code & we’ll go through them. Feel free to just copy & paste, but if you want to know how it works, stick around.
|
1 2 3 4 5 6 7 8 9 10 11 12 13 14 15 16 17 18 19 20 21 22 23 24 25 26 27 28 29 30 31 32 33 34 35 36 37 38 39 40 41 42 43 44 45 46 47 48 49 50 51 52 53 54 55 56 57 58 |
jQuery(function($) { var ch = 0; var item = 0; var items = $('#caption li').length; var time = 2000; var delay = 28; var wait = 3000 var tagOpen = false; $('#showCaption').css('width', ($('#caption').width() + 20)); function tickInterval() { if(item < items) { var text = $('#caption li:eq('+item+')').html(); type(text); text = null; var tick = setTimeout(tickInterval, time); } else { clearTimeout(tick); } } function type(text) { time = delay; ch++; if(text.substr((ch - 1), 1) == '<') { if(text.substr(ch, 1) == '/') { tagOpen = false; } var tag = ''; while(text.substr((ch - 1), 1) != '>') { tag += text.substr((ch - 1), 1); ch++; } ch++; tag += '>'; var html = /\<[a-z]+/i.exec(tag); if(html !== null) { html = html[0].replace('<', '</') + '>'; tagOpen = html; } } if(tagOpen !== false) { var t = text.substr(0, ch) + tagOpen; } else { var t = text.substr(0, ch); } $('#showCaption').html(t); if(ch > text.length) { item++; ch = 0; time = wait; } } var tick = setTimeout(tickInterval, time); }); |
Now let’s go through the code. First we set up a new variable called tagOpen this will keep track of the HTML tag that is currently open.
Now the next section is all about detecting the HTML tag & making sure it is always closed, if open. First we increase ch by one, since we start at zero and we use it as our length in the substr() function. Next we check if the last letter of that cut text is a waka (<), otherwise known as the opening bracket of an HTML tag. If it is we can assume we’ve found an HTML tag. So we can detect the closing tag we have a check to see if the latter after that is a forward slash (/) used to write a closing tag. If it is we set tagOpen to false since the tag now has it’s real closing tag, so we don’t need our fake one yet..
Next we create a variable to hold the actual tag, then we loop through our text until we find the closing waka (>) of the HTML tag, by using the substr method increasing ch each time we don’t find our waka. As we go we append each letter to the tag variable. Once it finds the closing waka the loop ends. Now because the loop ended when it found the closing waka, tag doesn’t contain it and the ch variable is 1 character lower than it should be. So we add the closing waka to tag and increase ch once more.
Now, HTML tags can contain attributes for example <span class="good">. We don’t want these in our closing tag, so to solve this we use regex to match the opening waka and the first word since that is the predictable format of an HTML tag. This is then stored in the html variable. Our previous code also matches closing tags, and the regex will produce a null result since it won’t match. To prevent this from crashing the code we check to make sure html is not null. If it isn’t we have a match, we replace the opening < with </ to make a closing tag, and tack on the closing waka since that wasn’t given back when the regex matched the tag. We finally set tagOpen to the newly assembled tag so it can survive through as many letters as needed until the real closing tag is found. Remember the code earlier sets tagOpen to false if it found a opening waka & then a forward slash? Well, that’s why.
This final section is to keep the tag closed for each loop after an opening tag has been found, if tagOpen is anything other than false then we must have an open tag so tack the closing tag to the end. If it’s false continue as normal.
There is one caveat to this code, and that is doesn’t work with nested HTML tags.

17 Comments
ScrptKddy
Very impressed with your obvious mastery. Indeed I am only a script kiddie… Way too much to do to actually learn all this stuff proper. We need people like you to help us look smart to all the muggles. So thanks a whole heap, Chet.
Javier Garcia
Thank you very much for sharing your knowledge.
I’m using his technique in two applications on facebook.
One is about funny questions and answers.
The other is a very recent baseball game.
His typewriter jquery make the difference!
Note: both applications are in Spanish.
Have a nice day.
Javier
Paul Robinson
Thank you Javier, glad the typewriter tutorial was useful.
Simon
Very nice effect! A little request: Would it be possible to make this a customizeable function, in the sense that you can call it on-demand (attach it to a click event, f.ex.) and define the element to be typed and typed into? Instead of (like now) when the DOM is ready, and with elements hardcoded directly in the function? I’m quite novice at jQuery/JS, but tried (and failed) to do some modifications, but it’s just an idea for you.
Paul Robinson
Hi Simon,
Thank you. 🙂
Sadly my knowledge of jQuery is relatively weak compared to that of PHP, HTML & CSS, but I will definitely give it a go & update the post with the results.
Check back in the next few days & hopefully I’ll have something up.
Simon
Sounds awesome 🙂 I’ve seen some alternative implementations, but yours has a nice advantage of working with code tags. If I’ll manage to implement it correctly, the intention is to use it for a browser-based text-only game – which I believe could be really entertaining.
I’ll check it out, good luck and thanks again!
Paul Robinson
Should be awesome
Sorry I haven’t gotten to creating a plugin yet. It’s been pretty busy round here and haven’t had much time to work on my personal projects such as this one. 🙁
C
Great script, looks fabulous! If you put this on Envato (Code Canyon) I will 100% buy it from you.
(I’ve got a bunch of money pre-paid there already). It looks great, works great, your description is great. Thank you, great fun to use. (if you do put it there btw, pls email me, so I can be true to my word & be the first to buy it!).
Question: I’ve inserted an image, with a linked reference as my final item. It works fine, but I end up with the image flashing a few times (presumably it’s mimicking the typing effect). It therefore looks like the image is having a seizure. Any thoughts on how to get rid of that? I’m a bit of a noob obviously. 🙂
Cheers.
C
While I’m asking Q’s… 🙂
Is it possible to nest this inside a pop-up jquery? that would be absolutely awesome & useful.
Cheers
Paul Robinson
Hi C,
I’ve never really thought about putting it on Envato before. I’ll see if I can get something sorted out & try and get it on there. I’ll drop you an email if I do. 😉
Honestly I don’t know if there is a way to solve that. The most likely reason the image is flashing is because the script is adding and removing the tag every time it types a new letter. I can’t think of any way around that problem since it has to do that to make the typewriting effect.
I don’t see why you couldn’t but you would have to have the typewriting effect triggered by an open callback in the modal (pop up) so that it knows when to start the effect.
Beliyadm
Hi! Thanks for nice writter.
One question – how create loop for the element, after last return to first again?
Best whishes!
Biglia
There is a bug when there are two html tags eg:
badgoodThe first “del” tag is fine, but the second “ins” tag not.
shahzaib
i need a plugin just like http://www.jquerynewsticker.com for wordpress
Magnus
I would like to add a random speed to the typing, for example with this code:
But when I use it, the wait and delay doesnt work proparly. How can I do this?
LRN
Nice scripting there, I’m looking forward to try it out this week. However I’ve come up with one possible problem if you feed HTML with tags in to the function: some tags, such as don’t have a closing tag, so they might break the effect or cause other strange behaviour. I’m not exactly sure how to sort this out yet. First thing that comes to mind would be an array with all the ‘words’ of the tags that have no closing counterpart and check any tags found against that array. But that might not be the most efficient way…
b
$.Typewriter w/ nice features like HTML support -> http://mn.tn/t